It was recently asked of me by a former student how I play multi-octave scales on the guitar. The answer involves a seven-note scale system I developed about 10 years ago while a in college. With it, I can fly up and down the neck relatively easily. I’m sure someone else on earth – probably many individuals – have the same scale system since it’s based on basic common sense. So, I thought I’d blog it for the rest of the world to enjoy.
My system starts with a three note per string scale method I learned in high school. Below are a few examples. Notice how in a three note system, your finger spacing is limited to three arrangements. That is, your fingers will be either whole steps apart, a whole and half step apart, or a half and a whole. This is a key concept. Remember it!
Fig.1
The three note system is nice, but it’s limited. You can ascend a good 2 octaves comfortably, but going higher or lower means position shifting, and subsequently shifting your mental focus from one position to another. Generally, the three note method is good to employ when you find the range on the neck you like and want to stay there a while. I use it all the time.
So, back to that finger spacing concept. Let’s start with position one of G major. (Fig. 2) You begin on the 3rd fret and ascend whole steps for three total notes. Then you jump to the next string and repeat. It’s easy to remember because it’s the same thing twice.
On the 4th string, you start on the 4th fret, do a half whole pattern, and repeat it on the 3rd string. (Fig. 2, Red notes) Again, easy.
Completing the first position is a simple matter of playing whole-half patterns at 5th fret of the 2nd AND 1st strings. (Fig. 2, Blue notes) So, to summarize, position one is two strings of whole-whole, two of half-whole, and two of whole-half. Simple, right?
Fig. 2
So, I started thinking: “Could I make this even easier to remember?” I thought perhaps one of the difficulties in the 3 note per string method is that you have to remember a different combination of intervals with each position, and there’s no orderly pattern to it as you ascend. This is not how it is on the piano. When you ascend an octave, the same pattern repeats for each octave.
Looking at the guitar, ascending two strings yields six notes. What if we added one more? In other words, instead of three notes per string, play three, then four, then three, then four, etc. Here’s what I discovered.
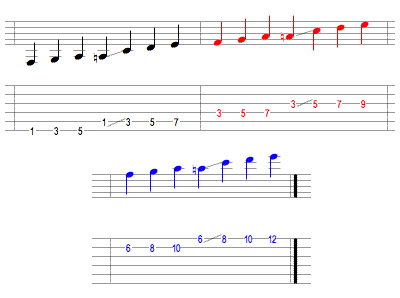
I was able to create a 7-note recurring scale pattern on the guitar by mixing one slide into each octave. For position one of G major, it begins as usual. Whole-whole at the 1st fret of the 6th string. However, when you hit Bb (1st fret) on the 5th string, slide up 2 frets before completing another whole-whole pattern.
Fig. 3
And the most beautiful thing about this is… every octave pattern is visually identical within each position! Look below at what I mean.
Fig. 4
Essentially we’ve made a building block of seven notes, and all we do is repeat this “block” up 2 frets on the D and G string (red notes), and the up 3 more frets on the B and E strings (blue notes). For those like myself who think visually, this method is remarkably easy to remember. For those who are not visually minded, you can just remember “Whole-Whole-Slide-Whole-Whole.” (See below.)
Fig. 5
Another beautiful aspect of this method is how, once you’ve mastered it, you no longer need to think about where you’re putting your fingers. The finger spacings remain the same for the entire duration of the scale! Suddenly your mind is free to think less about technique and more about the music you’re playing. Marvelous.
The question is bound to arise: “Sure, it works for position one. Does it work for the rest of the positions?”
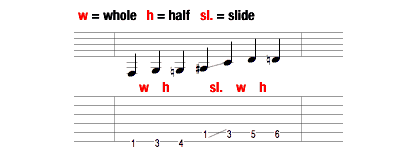
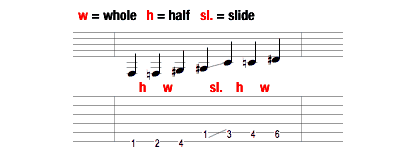
Yes. It Does! Position 2 and 3 use the exact same process, with different finger spacing. (All positions are shown from the 1st fret so we can focus more on the intervals and less on the actual notes.)
Fig. 6
Fig. 7
I was stumped over positions four, five, and six until I realized the trick: slide first. “Slide-whole-whole-whole-whole” is the formula for position four.
Fig. 8
Same trick with five and six.
Fig. 9
Fig. 10
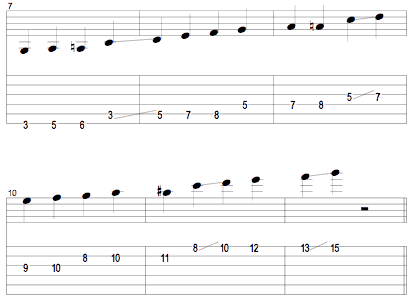
You may ask “What about position seven?” Seven is the only position that deviates from my system, but the work-around is fairly easy. Essentially you need to start one half step below position one and slide up. Easy.
So hear they all are. I’m starting on F (first fret of the 6th string) to fit them all on.







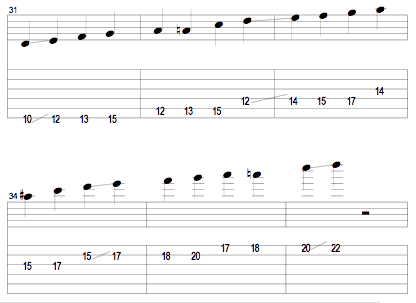
Thanks for the lesson.
Hello Travis!
Thank you for sharing that lesson, it’s a very clever and great way to move around the neck not having to bother so much about those “P.I.T.A finger combinations” .
I got a kick out of it, and I am trying to understand the different positions in relation to the modes, but I have no music education and although I’ve played for 20yrs I’ve never bothered about the theory until a couple of months ago. So I might be totally wrong here (probably) 🙂
would it be something like this?
pos 1: ionian ?
pos 2: aeolian ?
pos3: phrygian ?
pos4: mixolydian ?
pos5: lydian ?
po6: locrian ?
whatabout the dorian mode?
hehe well I might be way off on this
//Ken1
Thanks for that one!
Ken,
Yes, each position corresponds to a mode of major. In fact, which of these is “position 1” versus “position 5” or “position whatever” is entirely relative to the mode you’re in.
That said, you have the mode names a little mixed up in relation to my examples. They are in diatonic order.
pos 1: ionian
pos 2: dorian
pos3: phrygian
pos4: lydian
pos5: mixolydian
po6: aeolian
I did not develop a method for Position 7 because there’s only 6 possible combinations. Instead, read right below Figure 10. There I talk about what to do for locrean.